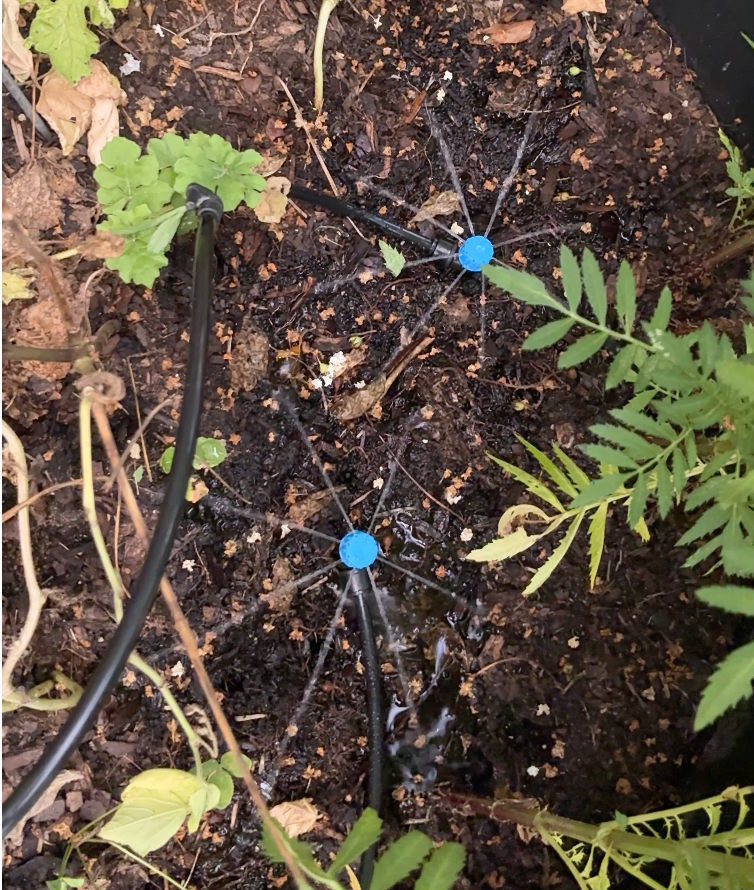
Hi from Sister Roots Farm! We are walking through our current watering system, what came in the box for our new irrigation system, how we set everything up and how everything looks once it is running. Links to all products are at the end of this post!
Our Current System & Why We Are Upgrading
Currently we use a Vevor rain barrel that we got from TikTok Shop along with a solar irrigation system from Amazon that we have been using for a while now. We have some prior videos explaining more about the rain barrel as well as the process for setting up the solar irrigation system.
For the most part the system has worked great. However some parts of the garden are not included in the solar irrigation system. The new flower tester bed is not included, nor is the watermelon area. A few other areas are also not included. The solar panel is on a schedule of every 12 hours for about three minutes. There are some different settings you can manipulate on the back and that is explained in a prior video.
The primary concern is that it has not worked as a rain barrel system like we wanted it to. In order for the system to work effectively the barrel has to be full. The concept is that rain will come in, fill it up and then the system cycles through on the time schedule like it is supposed to. However that has not been the case for us. We are not sure if it is the size of the barrel or the fact that we do not have it set up with gutters and a rain spout like some people do.
In order for the system to work we have to manually fill it with water and then it cycles like it is supposed to. The manual work is not necessarily bad because it has been working to help water the garden. However the concern is if we are not home and it runs out of water — say we are going on a trip or visiting family — then it is not going to cycle like it is supposed to. And some parts of the garden are still not included.
We could get some more tubing and add more connections to it and it could continue to work like it is. Because of the direction we are trying to go with Sister Roots Farm, it will be more beneficial to do a different system.
The new system connects to our outdoor spigot and we can control it from our phone. We can also convert it back to manual watering if we need to. We like both of those options!
The New System
Our new system includes an irrigation system and a water timer.


Planning & Setting Everything Up
The most important thing when setting up this system is that you have to plan everything out first. Here is how we did it!
Step 1 — Place your emitters first.
The first thing we did was place the different emitters in the beds where we wanted them to go. The installation guide shows the thicker tube connected to the hose running kind of parallel but that would not work for our garden. We had to do a setup that was just a singular loop throughout everything.


Step 2 — Place your connectors between the beds.
After placing the emitters we took the connectors and placed them in the areas where the garden beds would connect.


Step 3 — Thread your main tubing through the beds.
Begin with the end in mind. We knew where we wanted the tubing that connects to the water source to end up so we started threading it through before connecting anything. You want to try to keep your tubing behind and out of the way as much as you can.
Step 4 — Cut and connect the smaller drain tubing.
Once everything was mapped out we started cutting the smaller tubing and connecting everything. The connection is so simple. For the main line you push the tubing as far as you can in and then screw it tightly and it does not come out. For the drain line you cut the length you need and just plug it in and it grabs somehow in there. You just cut the smaller tubing to the length you need, plug it into your main connector and then plug it into your emitters. That is really the basic process throughout.
One thing to consider is that the different emitters have different spray patterns. With plants and leaves you really do not want them to be ultimately wet. Depending on your preference one emitter style may work better than another for keeping leaves dry.


We had enough of the bigger tubing to loop throughout the garden however we did not have enough to stretch all the way to the spigot on the outside of the house. So we are still using the hose for that connection for now. The great thing is when cutting the yard and we want to move the hose out of the way all we have to do is unscrew the smart timer and everything can separate.

The timer is currently set on a Sunday, Monday, Wednesday, Friday schedule to run at 7am for three minutes and 7pm for three minutes. We want to be mindful of whether it is going to run up the water bill so we kept it conservative for now.
The timer was easy to setup. The instructions said to stay close to it when connecting it to wifi; however, it didn’t connect until I was next to the wifi router.

Final Key Takeaways
If you take anything from this post plan out everything first.
- Stick all your emitters where you want them to go
- Be mindful of where your main tubing needs to be
- Put your connectors between the beds where they are going to connect
- Once all those main pieces are in place then use the smaller drain tubing
- Cut the smaller tubing to length and plug everything in — it is simpler than it looks!
- Do not feel like you have to follow the installation guide exactly — adapt it to your garden
We have a bunch of the smaller tubing left over so there is room to expand. For the most part we are so happy to have consistent watering in all parts of the garden now!

If you want to see a step by step walkthrough of this entire process head over to our YouTube channel — link below! As always thank you so much for coming along on this journey. Chat soon! 🌱
Edited with Claude AI 🤖
Links:
We Upgraded our Garden Watering System Youtube Video – https://youtu.be/ADdoxSFpMf4?si=L3AnKEufRn22UA0z
Solar irrigation system – https://www.amazon.com/dp/B0BNVMVFG8/?coliid=I2D4UX067FCR4P&colid=2TQ502ZATH5TD&ref_=list_c_wl_lv_ov_lig_dp_it&th=1
Drip Irrigation system – https://www.amazon.com/dp/B0F6Y9CSZP/?coliid=IBFZ3FGROJJIS&colid=2TQ502ZATH5TD&ref_=list_c_wl_lv_ov_lig_dp_it&th=1
Smart Water Timer – https://www.amazon.com/dp/B0H1B45VMF/?coliid=I1KJJ42VE0OV3U&colid=2TQ502ZATH5TD&ref_=list_c_wl_lv_ov_lig_dp_it&th=1
Vevor Rain Barrel – https://www.amazon.com/dp/B0D9263J7W/?coliid=I2IG02UZXRJG05&colid=2TQ502ZATH5TD&ref_=list_c_wl_lv_ov_lig_dp_it&th=1